ServiceNow – SCOM Connector – Overview

This is the first part of a series about ServiceNow Event Management with the SCOM Connector.

Part 2: SCOM Connector Setup

System Center Operations Manager is a great monitoring tool, but when you start to think about ITIL Event Management, then you realize that the second level event correlation is missing and the automatic integration into other ITIL processes like Incident, Request Fulfillment etc.

You probably think, but there is Service Manager, the ITSM tool from Microsoft, which can be integrated also with SCOM. Yes, but it only only has the direct event to ticket link and no additional event correlation.  Also you need a workflow engine like Orchestrator, SMA or Azure Automation to create the references, etc. A lot more separated components, which also need to be maintained.

ServiceNow is a cloud hosted service and one of the leaders in the ITSM area. It has an integrated workflow engine and the intention here is that you only need one console (ServiceNow).

Background

The Event Management application is part of the IT Operations Management area, which also covers CMDB Discovery, Service Mapping and Orchestration. With the Event Management application you connect one or more monitoring sources, which could also be emails sent to your ServiceNow instance, and create ServiceNow events out of it.

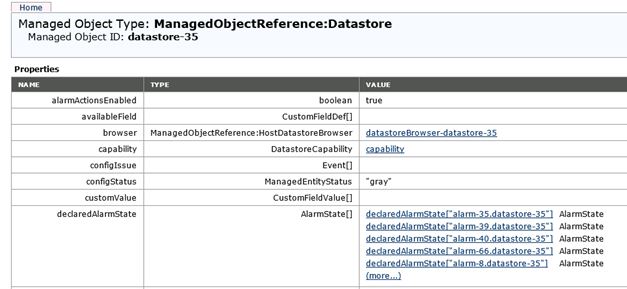
The SCOM Connector is only one option to connect external sources to the ServiceNow Event Management application. The SCOM connector takes the SCOM alerts and creates ServiceNow events out of them. The identifier is the SCOM Alert ID. With that it also can later identify which alert to close (bi-directional integration).

EventManagement Overview

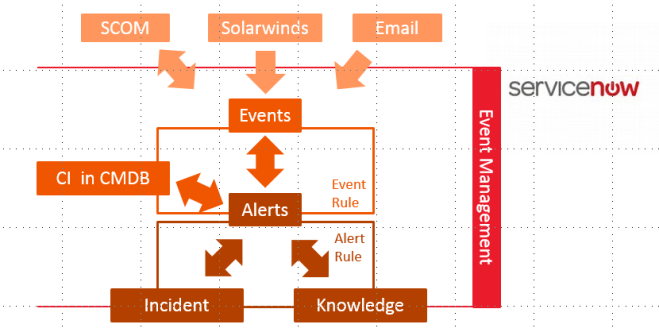
You can see in the picture that ServiceNow takes the events and creates alerts out of them. The beauty of the alert is that it has a relation already to the Configuration Item, which is affected by this alert (Requirement: a filled and maintained CMDB).

ServiceNow has event rules to handle the incoming events:

  • Event rules can:
    • determine which events can be ignored
    • transform data from the events into fields from the alert
    • define how to map the correct Configuration Item for each alert

On top of the alerts there are multiple things that can happen:

1. Alert deduplication

Alerts with the same message key, will be correlated to one alert. This is really deduplication.

SCOM alerts have the SCOM Alert ID in the Message Key field of the ServiceNow alert. ServiceNow can automatically deduplicate (multiple events : one alert) on the same Message Key or the same Metric Name. The Message Key does not work or SCOM alerts, but the Metric Name works. If the events do not deduplicate correct to one alert, then check, if the Metric Name is filled. If not, then you can manipulate the Metric Name through an event rule (I would recommend to override it with the MonitoringObjectFullName).

2. Correlation through alert correlation rules

ServiceNow already tries to find alerts, which belong together based on machine learning, but you can create your own correlation rules. The correlation rule always defines, which one is the first alert, and which the second. Then you define what the relationship type is and in which timeframe the alerts should be correlated.

3. Alert flapping detection

Alert flapping detection is a general setting for all alerts, there are no rules, which can be defined. You configure the interval, frequency, quite interval and the minimum time in seconds to wait before an alert gets updated.

4. Alert action rules

With alert actions you can define if i.e. incidents should be created automatically for defined alerts. You can also link knowledge articles automatically or define recovery actions (this requires Orchestration).

I mentioned Configuration Items already, which shows that Event Management has a strong relation to Configuration Management and the CMDB. In order to leverage the full capabilities of Event Management, you will need to have a vital CMDB (minimum have all objects in your CMDB which you monitor in SCOM plus adding them to services => you will see why in the next section)

What do I get, when I connect SCOM to ServiceNow?

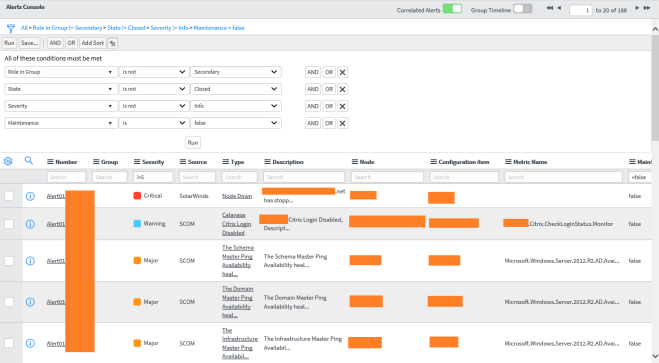
  1. One central alert console for all monitoring sources
    EventManagement AlertConsole
  2. ITIL automation
    – Central Knowledge repository
    – Automatic Incident creation and alert closure, when incident is closed (only with bi-directional integration checked)
  3. Service Dashboards
    EventManagement Dashboard
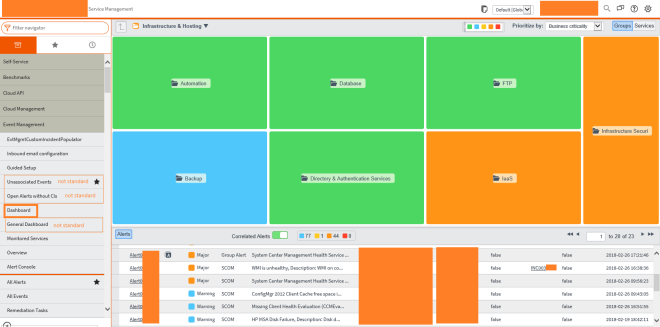
    You can define the services you have in your company. Through the relation between the alert and the CI you can see the affected services, where the CI belongs to.
    This dashboard only shows alerts, which are affecting the displayed services!
    EventManagement ServiceMap
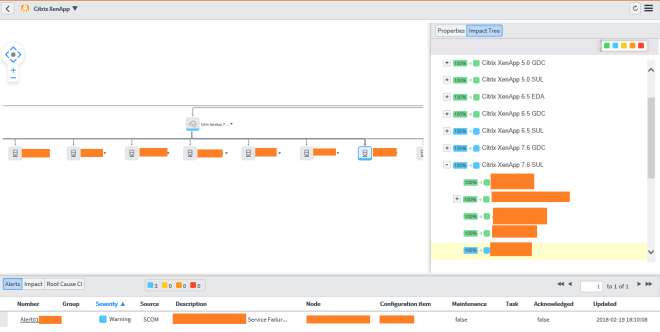
    By double clicking one service, you get into the service map view
  4. Central Metric Dashboards, which visualizes the performance data, collected in SCOM (only available with Metric Collection, which needs to be licensed separately)

What is missing?

Alerts which are set into maintenance mode in SCOM are still transferred to ServiceNow, but they do not bring over the field “MonitoringObjectInMaintenanceMode”, therefore you cannot identify them.
I raised this problem with the Event Management product group and hope that they will fix that soon.

Important Notice
Do not try to use ServiceNow to improve your bad monitoring config! Try to avoid alerts in your SCOM environment and give the correct severity there.


SCOM 2016 – Agent Maintenance Mode

I was pleased to present a session about “Why we want you to migrate to SCOM 2016” with Bob Cornelissen at MMSMOA in Minneapolis. During this session I presented about SCOM 2016 Agent maintenance mode.

With System Center Operations Manager 2016 we finally have our scheduled maintenance mode and also the option to directly set the maintenance mode from the agent. We do not need custom management packs/solutions anymore to get this functionality. Everything is build in :-).

When I tried the Agent maintenance mode first, I followed this blog post. I want to share some details here:

  • Open PowerShell as Administrator, otherwise the module does not work. I tried to set permissions on the registry key, which is used, but that did not help. The module itself seems to check the permissions.
    2.AgentMaintenance-AdminError.PNG
  • You need to load the module with the full path, otherwise it is not working:
    import-module “C:\Program Files\Microsoft Monitoring Agent\Agent\MaintenanceMode.dll”
  • The Syntax to start maintenance mode is this:
    Start-SCOMAgentMaintenanceMode -Duration 10 -Reason ApplicationInstallation -Comment “Test”
    4.AgentMaintenance-SetMaint.PNG
    I recommend to use the PowerShell ISE as you then also get the entries for the reason.
  • The cmdlet writes the information into the registry.
    hklm:\Software\Microsoft\Microsoft Operations Manager\3.0\MaintenanceMode\Record
    8.AgentMaintenance-RegKey.PNG
  • When you try again to set the maintenance mode and the system is not in maintenance mode yet, then you get this feedback:
    5.AgentMaintenance-SetMaint-Pending
    Last Maintenance Mode Request pending. Try afterwards.
  • There is a rule running on the agent, which checks the registry key every 5 min.
    Agent Initiated Maintenance Mode Rule
    The rule runs a PowerShell script (ReadMaintenanceModeRegEntry,ps1), which writes a OperationsManager Event Log entry with the EventID 2222. After that appears, the maintenance mode should been set successfully.
    7.AgentMaintenance-Event2222
    After the maintenance mode is set, you get this message when you try to set it again during the maintenance mode:
    6.AgentMaintenance-ProbablyMaint
  • If you want to unset the maintenance mode and set a new one, then you can delete the registry key, unset the maintenance mode in the console and then set the maintenance mode again.
  • You can also easily read the key through PowerShell and give users who normally do not have registry access the possibility to check the current maintenance mode window.
    function Get-SCOMAgentMaintenanceMode {
    $mm=(Get-ItemProperty “hklm:\software\microsoft\microsoft operations manager\3.0\maintenancemode”).Record
    $split=$mm.split(“|”)
    write-host “Duration:”$split[0]”
    Reason:”$split[1]”
    User:”$split[2].split(“:”)[0]”
    Comment:”$split[2].split(“:”)[1]”
    StartTime:”$split[3]
    }
    Get-SCOMAgentMaintenanceMode

Have fun with it!

SCOM:Veeam VMware Collector: VMware connection data processing errors

This is a short blog post to give you some alert troubleshooting details.

The alert VMware connection data processing errors from the Veeam VMware management pack (8.x) needs a collector server and a Run As Account with permissions in VCenter. Permissions are described in this article.

Alert details:
“The Veeam VMware Collector service was not able to process data it received from the VMware target. Some data could be missing in the VMware API response or it could be a parsing error. Some performance data may not be published. The exact error received from Collector: VP050 Error encountered while retrieving performance metrics for a cluster on system name. The VMware API error returned was: ‘One or more errors occurred.’.”

The alert details talk about performance metrics, which confused me.

The Veeam logs (you get them through the Veeam Enterprise Console) show these details:

[VP120] retrieveDatastores failed, A: No ‘datastore’ objects returned for VC,
Collector cannot access a datastore at the vCenter.
Then, [VP038] buildInventory failed [system name]
Cannot build topology always for system name

And after that you seeing [VP050] performanceDaemon One or more errors occurred.

Possible root causes:

1. system does not have a datastore at all
2. no permissions => re check permissions (see link above)

The permissions need to be set on the top level of the cluster not below!

To check, if the system has a datastore, you can browse the following webpage: http://system name/mob or https://system name/mob. Login with the Run As Account.

veeamcontent

Then click the content link.

veeamrootfolder

Click the link beside the rootFolder entry.

veeamchildentry

Click the link beside the childEntitiy entry.

veeamdatastore

If you see one or more datastores in the list, then the permissions are correct.

You can also click on one of the datastore links to verify.

veeamdatastoredetails

When both topics are resolved (permissions and datastore access) then the alert should resolve itself.

SCSM 2012: Asset Management Part 6 – Runbook/Automation details

This is the sixth and last part of the blog series about my Asset Management solution for SCSM 2012 R2.
Part 1: General overview
Part 2: Authoring – Classes and Relationships
Part 3: Folders and Views
Part 4: Authoring – Forms
Part 5: Reports

This part of the series covers the runbooks which are created with System Center Orchestrator 2012 R2.

All Orchestrator Runbook servers need the following software and Integration Packs installed:

Nearly all runbooks use the SCSMServer variable, which you need to set:
scsmservervariable

There are three main runbooks. All check the status of Windows Computers and create or update assets. All three inform site owners at the end through email. These activities also need adjustment as you need to enter the SMTP server information and email addresses.

You can read this blog to understand the dependency between the Windows Computer object and the Deployed Computer object from SCCM. There you also see that some information, which we need to create the asset, is in the Deployed Computer object (as the serial number).

1.Create assets:

createassets

This is the main runbook to create the computer assets. It checks if the asset for a deployed Windows Computer exists, if it exists, then it only checks the relationship and updates the asset. If it does not exist, then it gets the required information through the sub runbooks and then creates the asset and the necessary relationships.

2. Update assets:
updateassets
This runbook only updates the location information, if the asset was re-imaged at a new site.

3. Check deleted:
checkdeleted

This runbook only checks for deleted objects, but does not delete the asset, as it should stay in the database.

The following sub runbooks get additional information for the assets.

Get Location information:
getlocationinfo
This runbook checks if the list entries exist for the country and site and if they are new, then it creates the enum list entry.

This runbook in the “Get Location Info” activity checks a local text file, which has the site information in this format Shortname – Site – Country – Region. Example: FRA – Frankfurt – Germany – Europe. You can also query that information from a database if you have it there.

In the “Check Country/Site” activity it checks if the enum value exists and if not, then it creates it. You will need to check, if you have another GUID for your enum lists:

$CountryEnum=’c94c8568-8cc8-2f32-ec3a-8b8b04cc9848′

$SiteEnum=’9d07bd6a-9e08-439e-486c-4ba4e7f88b30′

Check Model/Manufacturer:
checkmodelmanufacturer

This runbook checks if the list entries exist for the model and manufacturer and if they are new, then it creates the enum list entry.

You will need to check, if you have another GUID for your enum lists:

$ManufacturerEnum=’6e131742-a95b-6143-05c8-ee0f1aabae06′
$ModelEnum=’457cb61d-0c0c-7229-62ef-7b343f7b7941′

Get Warranty information: Find detailed information in this post.
getwarranty

Create AssetToComputerAsset Relationship:

createassetrelationship

Create AssetCustodian Relationship:

setcustodian

Check Relationships:

checkrelationships
Additionally we have this runbook, which checks the relationships for all classes to the AssetManagementBase class and creates them, if they do not exist.

These runbooks all only check the Windows Computer objects. If you have another source which you can use to create/update other asset object types, then you can create your own runbooks for it.

Have fun!


SCSM 2012: Asset Management Part 5 – Reports

This is the fifth part of the blog series about my Asset Management solution for SCSM 2012 R2.
Part 1: General overview
Part 2: Authoring – Classes and Relationships
Part 3: Folders and Views
Part 4: Authoring – Forms
Part 6: Runbook/Automation details

This part covers SSRS reports to export the data out of the SCSM database.

The reports are connecting to the ServiceManager database and not the DataWarehouse, so that also environments without a DW can use this.

First create your SCSM database DataSource and enter the SQL server instance where your ServiceManager database is installed.

scsmds

You can import my published reports or you create your own based on this example.

Create a new report and use the table wizard or create a blank report. You need to define a DataSet to retrieve the data.

The shown details of the DataSet belong to the All Computer Assets report.

The DataSet has a lot of joins because of the class structure and that some properties are not in the base class but in the sub classes. That is also the reason why the report takes a while to run.

with tab1 as
(
select
AssetID_DFC39F85_F244_B890_ABE1_434092CE4CCF as AssitID,
DS2.DisplayName as Region,
DS.DisplayName as Country, DS1.DisplayName as Site,
DS3.DisplayName as Manufacturer,
A.WarrantySLA_2436F00C_8311_69F9_51BC_4A117865E691 as WarrantySLA,
A.WarrantyExpirationDate_9F77D31A_5E17_203A_9A1C_3053CA0CB5BD as WarrantyExpire,
A.EquipmentCost_B0AD0B19_CE43_82BD_21BD_4AF08B32F0E5 as EquipmentCost,
A.MaintenanceContractReferenceNumber_7E79B4BD_24FE_2FCA_5B99_AD07D07EF49C as MaintNumber,
A.MaintenanceExpirationDate_8D4D2459_1179_1448_7725_01378A3A9ADE as MaintExpire,
DS4.DisplayName as AssetStatus,
A.AssetTag_323C1952_001D_7A22_769C_75E87571AC00 as AssetTag,
A.SerialNumber_B6972540_76A0_783B_4D52_50550ACBB70D as SerialNumber,
A.GoodsReceivedDate_EA1CE6FE_E807_7443_DBE6_30668AC97EEF as GoodsReceived,
DS5.DisplayName as Model,
DS6.DisplayName as Type,
DS7.DisplayName as Category,
usr.DisplayName as Custodian,
usr.UserName_6AF77E23_669B_123F_B392_323C17097BBD as CustodianID
from
MT_AssetManagementBaseClass as A with (NOLOCK)
inner join MT_ComputerAsset as C on A.BaseManagedEntityId = C.BaseManagedEntityId
left join dbo.DisplayStringView as DS2 with (NOLOCK) on A.Region_CC2529A0_A250_14EA_545F_64690C2641AD = DS2.MPElementId
left join dbo.DisplayStringView as DS with (NOLOCK) on A.Country_E7A6DA1E_DAA6_CEFF_0359_71D21E300887 = DS.MPElementID
left join dbo.DisplayStringView as DS1 with (NOLOCK) on A.Site_EF2272FC_B5F0_4FF4_19DB_873308FD9E21 = DS1.MPElementID
left join dbo.DisplayStringView as DS3 with (NOLOCK) on A.AssetManufacturer_C56091BA_FDCE_AA2A_F1BD_C6DE0483F1E5 = DS3. MPElementId
left join dbo.DisplayStringView as DS4 with (NOLOCK) on A.AssetStatus_B6E7674B_684A_040D_30B8_D1B42CCB3BC6 = DS4.MPElementId
left join dbo.DisplayStringView as DS5 with (NOLOCK) on C.AssetModel_9044D038_1D8D_F1C3_62D0_689A4FB335B6 = DS5.MPElementId
left join dbo.DisplayStringView as DS6 with (NOLOCK) on C.Type_91F17DA4_E885_2295_6A8F_99454001961A = DS6.MPElementId
left join dbo.DisplayStringView as DS7 with (NOLOCK) on C.Category_7A7B2210_04E4_DCB3_D669_401D6E5652FD = DS7.MPElementId
left outer join relationship rel with (nolock) on rel.SourceEntityId = A.BaseManagedEntityId and rel.RelationshipTypeId=’27C08AC8-422E-B3DB-DE9E-1AC2C3D351D7′ — AssetToCustodian Relationship
and rel.IsDeleted=0
left outer join MTV_System$Domain$User usr with (nolock) on rel.TargetEntityId = usr.BaseManagedEntityId
where DS4.LanguageCode = ‘ENU’
)
select distinct * from tabsq

The result looks like this: (All Computer Assets)
allcomputerassetsreport

The solution has a report for all four asset types like (Computer Asset, Peripheral, Server Infrastructure Asset and Network Infrastructure Asset). The DataSet differs mainly in the selected table, in this example it is the MT_ComputerAsset.

There is also one additional report to list all Computer Assets owned by a Custodian:
computerassetsbycustodian

You can find all reports on github.

reports

SCOM: Sample Maintenance Mode MP works on SCOM 2016

With all the great changes related to Maintenance Mode in SCOM 2016 you probably only miss the possibility to easily set Maintenance Mode on the agent without the need of knowing the PowerShell script details.

My old Sample Maintenance Mode management pack can help you with this also on SCOM 2016. I have imported it into my SCOM 2016 test environment and set a server into maintenance mode through it without any problem.

It was required in the past, that you deploy the files separately to the agents to have the Splash Screen available. Now I have added the files to the Visual Studio solution and deploy them to c:\it\mom\mm. The solution also adds a shortcut to the default user desktop and to the public startup folder on Windows Server 2012 and above (also applies to the corresponding client versions). I have used the examples from David Allen’s blog post.

I have posted the sample sealed mpb file on github including also the whole solution.

To adjust the solution to your needs I recommend to change the text in the file OpsMgrMM.ps1 which runs the Splash Screen.
Also you can change the target directory in the DeployableFile.ps1:

$TargetDirectory = “C:\IT\MOM\MM”

You will find both files in the Resources folder.

When you have done your adjustments, then build the solution (seal the mps) and import the mpb file into your SCOM environment. If you had a previous version installed, then you will need to remove that first.

Have fun with it!


SCSM 2012: Asset Management Part 4 – Authoring Forms

This is the fourth part of the blog series about my Asset Management solution for SCSM 2012 R2.

Part 1: General overview
Part 2: Authoring – Classes and Relationships
Part 3: Folders and Views
Part 5: Reports
Part 6: Runbook/Automation details

This part of the series covers the forms created with Visual Studio 2015 Community Edition (incl. VSAE).

Each object which has a view in the solution also needs a form to enter values and a preview form (OneWay).

The forms are based on the WPF User Control library (requires .Net 3.5).

All forms and resources required for the forms are defined in the AssetManagementForms Assembly, which is referenced in the AssetManagement management pack in the References area and in the Forms.mpx.
formsreference2
Forms.mpx:
formsreference

Each form needs to be listed here (standard and preview). The targeted TypeProjection defines which classes will be referenced in the form.

<Form ID=”AssetManagementForms.Computer” Assembly=”AssetManagementForms.Assembly” Accessibility=”Public” Target=”ComputerAsset.Form.TypeProjection” TypeName=”AssetManagementForms.Computer”>
<Category>Form</Category>
</Form>
<Form ID=”AssetManagementForms.Computer.Preview” Assembly=”AssetManagementForms.Assembly” Accessibility=”Public” Target=”ComputerAsset.Form.TypeProjection” TypeName=”AssetManagementForms.ComputerPreview”>
<Category>Form</Category>
</Form>

A ResourceDictionary is used to give all EnumClass Guids a meaningful name (Resources.xaml):
resourcedictionary

This dictionary is referenced in each form before the Grid definition:
<UserControl.Resources>
<ResourceDictionary>
<ResourceDictionary.MergedDictionaries>
<ResourceDictionary Source=”Resources.xaml“/>
</ResourceDictionary.MergedDictionaries>
</ResourceDictionary>
</UserControl.Resources>

All required libraries need to be referenced at the beginning of the forms:
libraries

ComputerAsset Form:
computerassetform

Order Form:
orderform

The forms contain a Grid with two columns and a lot of rows.
Each Panel contains a label and a field – of different types: TextBox, ListPicker, DatePicker or UserPicker. You can also only reference an image.

Here are examples of the different types:
<Label Name=”AssetID” Content=”{Binding AssetID, Mode=OneWay}” Height=”31″ FontWeight=”Bold” FontSize=”16″/>

<TextBox x:Name=”AssetTag” Text=”{Binding AssetTag, Mode=TwoWay}” />

<Image x:Name=”Logo” Height=”40″ Source=”/AssetManagementForms;component/Logo_NoTag_150px.png”/>

<scwpf:ListPicker x:Name=”AssetLifecycleStatus” HorizontalAlignment=”Stretch” Width=”Auto” ParentCategoryId=”{Binding Mode=OneWay, Source={x:Static local:Resources.guidAssetStatusTypeEnumRoot}}” SelectedItem=”{Binding AssetStatus, Mode=TwoWay, UpdateSourceTrigger=PropertyChanged}”/>

The ListPicker is used everywhere where we want to show the predefined values of the selected EnumType.

<wpfToolKit:DatePicker Text=”{Binding GoodsReceivedDate, Mode=TwoWay, UpdateSourceTrigger=PropertyChanged}” SelectedDateFormat=”FullDateTime” />

<scwpf:UserPicker x:Name=”AssetCustodian” User=”{Binding Path=ComponentAlias_d5fb8379_ba30_4351_9e9a_ec9fbd9a3b65, Mode=TwoWay}” />

If we also want to show the Related Items and History information, then we need to add the required tabs:
     <TabItem Header=”Related Items” x:Name=”tabItemRelItems”/>
            <TabItem Header=”History” x:Name=”tabItemHistory”>
                <scwpf:HistoryTab/>
            </TabItem>

All Preview forms only have TextBoxes no Pickers and also no Related Items or History tab.

ComputerAsset PreviewForm:
computerassetpreviewform

Here are some links which helped me to create these forms:


SCSM 2012: Asset Management Part 3 – Folders and Views

This is the third part of the blog series about my Asset Management solution for SCSM 2012 R2.

Part 1: General overview
Part 2: Authoring – Classes and Relationships
Part 4: Authoring – Forms
Part 5: Reports
Part 6: Runbook/Automation details

This part of the series covers the folders and views created with Visual Studio 2015 Community Edition (incl. VSAE).

folderviewstructure

The following details can be found in the AssetManagementViews.mp.

Folders: (Folders.mpx)

This entry creates the AssetManagement Workspace:
<Folder ID=”Folder.AssetManagementWorkspace” Accessibility=”Public” ParentFolder=”EnterpriseManagement!ServiceManager.Console.RootFolder” />

Then we have the AssetManagement Root Folder:
<FolderItem ElementID=”EnterpriseManagement!Microsoft.EnterpriseManagement.ServiceManager.UI.Console.Task.CreateFolder” ID=”FolderItem.AssetManagementRootFolder.CreateFolder” Folder=”Folder.AssetManagementWorkspace.RootFolder” />

This entry displays the view in the folder:
<FolderItem ElementID=”EnterpriseManagement!Microsoft.EnterpriseManagement.ServiceManager.UI.Console.Task.CreateGridView” ID=”FolderItem.AssetManagementRootFolder.CreateView” Folder=”Folder.AssetManagementWorkspace.RootFolder” />     

And below the root folder are all class related folders:
OtherFolders.JPG

Each folder has an icon defined through the ImageReference:
images

Views: (Views.mpx)

Each class has its own view, and I also created views for WindowsComputer objects, Users and Groups.

Here are two examples how the views are assigned to the folders:
<FolderItem ElementID=”View.ComputerAssets” ID=”FolderItem.AllComputerAssets.View” Folder=”Folder.ComputerAssets” />
<FolderItem ElementID=”View.AllWindowsComputers” ID=”FolderItem.AllWindowsComputers.View” Folder=”Folder.AssetManagementWorkspace.RootFolder” />

The views use all the same icon as the folders. Here is an example of the default config item image, which is used for the groups:
<ImageReference ElementID=”View.AllUsersandGroups” ImageID=”ConfigurationManagement!ConfigItemImage16x16″ />

For each view we also need to create two categories:

  1. To display the create class object task: (Here “Create Computer Asset”)
    <Category ID=”View.ComputerAssets.CreateAsset.Category” Target=”View.ComputerAssets” Value=”MESUA!Microsoft.EnterpriseManagement.ServiceManager.UI.Authoring.CreateTypeCategory”/>
  2. To display tasks in general:
    <Category ID=”View.ComputerAssets.ViewTasks” Target=”View.ComputerAssets” Value=”EnterpriseManagement!Microsoft.EnterpriseManagement.ServiceManager.UI.Console.ViewTasks” />

Each view needs to have a TypeProjection defined to display fields from other classes in the same view. The TypeProjection represents the reference between the two classes. TypeProjections only work, if corresponding relationships are defined.

<TypeProjection ID=”ComputerAsset.TypeProjection” Accessibility=”Public” Type=”ComputerAsset”>
<Component Path=”$Context/Path[Relationship=’AssetToCustodianRelationShip’]$” Alias=”ComponentAlias_d5fb8379_ba30_4351_9e9a_ec9fbd9a3b65” />
</TypeProjection>

In the views you use the Alias of the TypeProjection to guide Service Manager (through the relationship) to the other class fields.
The second sample TypeProjection shows the GeneralAssets view, which is the longest one, because it references all classes.

TypeProjection.jpg

View details:

Each view needs targets a class whose objects get displayed. For the GeneralAssets view it is the AssetManagementBaseClass.

<View ID=”View.GeneralAssets” Accessibility=”Public” Enabled=”true” Target=”AssetManagementMP!AssetManagementBaseClass” TypeID=”EnterpriseManagement!GridViewType” …

Then the TypeProjection needs to be referenced:

…<ItemsSource>…<AdvancedListSupportClass.Parameters>
<QueryParameter Parameter=”TypeProjectionId” Value=”$MPElement[Name=’AssetManagementMP!GeneralAsset_TypeProjection’]$” />
</AdvancedListSupportClass.Parameters>…
</ItemsSource>…

The <Criteria> area defines which objects will be displayed. We do not want to see objects with the status inactive.

…<Criteria>…
<SimpleExpression>
<ValueExpressionLeft>
<Property>$Context/Property[Type=’System!System.ConfigItem’]/ObjectStatus$</Property>
</ValueExpressionLeft>
<Operator>NotEqual</Operator>
<ValueExpressionRight>
<Value>{47101e64-237f-12c8-e3f5-ec5a665412fb}</Value>
</ValueExpressionRight>
</SimpleExpression>
…</Criteria>…

The next section in the view handles the <Presentation> of the data, i.e. which columns are displayed.

If there are assemblies which need to be referenced to display data, then they are listed in front of the columns. In our case we reference the AssetManagementForms assembly:
xmlns:local=”clr-namespace:AssetManagementForms;assembly=AssetManagementForms”>…

Each column which should be displayed needs an entry with a binding to the class parameter.  All are only for viewing therefore the mode is OneWay.

Some string examples:
<mux:Column Name=”SerialNumber” DisplayMemberBinding=”{Binding Path=SerialNumber, Mode=OneWay}” Width=”100″ DisplayName=”SerialNumber.View.GeneralAssets” Property=”SerialNumber” DataType=”s:String” />

Binding to the DisplayName of the Enum value:
<mux:Column Name=”Country.DisplayName” DisplayMemberBinding=”{Binding Path=Country.DisplayName, Mode=OneWay}” Width=”100″ DisplayName=”Country.View.GeneralAssets” Property=”Country.DisplayName” DataType=”s:String” />

And if the data comes from another class than the targeted one then you need to use the alias of the reference in the TypeProjection:
<mux:Column Name=”AssetCustodian” DisplayMemberBinding=”{Binding Path=ComponentAlias_b1f46e16_e9a0_49af_b9f5_1c9d4bb532d1.DisplayName, Mode=OneWay}” Width=”100″ DisplayName=”AssetCustodian.View.GeneralAssets” Property=”ComponentAlias_b527cd23_9043_48a2_a3c8_111ab26f0a95.DisplayName” DataType=”s:String” />

Date example:
<mux:Column Name=”GoodsReceivedDate” DisplayMemberBinding=”{datebinding:DateBinding Path=GoodsReceivedDate, Mode=OneWay}” Width=”100″ DisplayName=”GoodsReceivedDate.View.GeneralAssets” Property=”GoodsReceivedDate” DataType=”s:DateTime” />

There are also some internal fields which could be useful to be displayed: $TimeAdded$, $LastModified$.

The last part of the presentation area is <ViewStrings>. Each DisplayName of a column needs to have an entry there also:

<ViewString ID=”AssetCustodian.View.GeneralAssets“>$MPElement[Name=”AssetCustodian.View.GeneralAssets”]$</ViewString>

So, all views are build relatively the same as they are all grid views targeted to one class. The main difference are the TypeProjections and columns which are displayed.

Here are some additional links which help to understand the Presentation area:

I will publish the whole Visual Studio Project at the end of my series.


SCOR 2012: Monitor expired CA certificates

A lot people might think, why should I monitor expiring certificates with System Center Orchestrator 2012. There are already solutions to monitor certificates in the local store on Windows computers – for example the wonderful solution from Raphael Burri (PKI Certificate Verification MP).

But we had an issue with an expired certificate on non-windows systems. With that problem the idea came up to directly query expired certificates from the certificate authority (CA) – our internal cert store. We also wanted to notify the requesters directly, when a certificate expires within the next 30 days, send him/her reminders and last but not least inform the management a few days before the certificate expires, if no one has taken an action. With that idea we through about an automation solution – System Center Orchestrator.

Here is the description of the solution.

Prerequisites:

  • System Center Orchestrator 2012 R2
  • Exchange Mailbox to send and receive emails and a user which has permissions to it
  • Exchange Users Integration Pack
  • PS PKI PowerShell module installed on all Runbook servers
  • Microsoft Certification Authority
  • SQL Temp database (Orchestrator Temp)

Temp Database config:
certificates-table

Mailbox folders:
outlookfolders

Exchange Users Integration Pack Config:
GetEmail:
getemailconfig

Move Email:
moveemailconfig

For both configurations you need to know the path of your Exchange Server EWS service: https://autodiscover.fqdn/EWS/Exchange.asmx and the user with domain and password, which owns the mailbox.

After importing the runbooks, you will also need to configure the SQL activites (enter DB instance and Database) and the Send email activities (SMTP server and addresses). There will be some more things to change, but I will mention them in the runbook descriptions.

I suggest to run the runbooks through a scheduled task on a daily basis.

The first runbook reads the certificates and writes them to the database:

Certificates.WriteToDB

certificates-writetodb
Update the template list, you want to check, in the GetCerts Activity:
$Templist=@(
“WebServer”, #Web Server
“1.3.6.1.4.1.311.21.8.15817755.12287325.10963384.6580300.14252506.110.2574398.13148790” #Web Servers
)

Enter the names of the CAs which should be checked:
$canames=@(‘CA1FQDN‘,’CA2FQDN‘)

Certificates.GetRequesterEmail
certificates-getrequesteremail
Update the domain names and FQDNs which should be checked in the Get Requester Email activity.

function get-domain($dn)
{
if($dn -like “*,dc=domainshortname1*”){$domain = “domain1fqdn“}
if($dn -like “*,dc=domainshortname2*”){$domain = “domain2fqdn“}
return $domain
}

Now that we have all expiring certificates in the database, we need a runbook, which sends out the notifications.

Certificates.Notifications

certificates-noifications

The first email will be send out when 30 days are left and it should be send to the service desk to create a ticket. The requester will be on CC. The second email is send to the requester from day 29 to day 4. And then the last emails will be send to the management and the requester as CC.

We also created two additional runbooks to update the requester, if this information is not current anymore or to stop the notifications, if the certificate is already extended.
The requester has the option in his emails to click on a link which creates a new pre-filled email for both situations. If the certificate PPR changed, then he/she should enter the email address of the new PPR into the CC field and send the email. If the certificate was extended, then he/she only needs to send the email.

CertificateEmail.JPG

The emails will be sent to the mailbox for which we configured the Exchange User IP before.

Information:Certificate extended email
certificateextendedemail

Information:Change certificate PPR emailcertificate-newrequesteremail

Certificates.UpdateRequesterEmailcertificates-updaterequesteremail

This runbook takes the email address of the CC field and writes it to the database, then it moves the email to the Certificates.NewRequester folder in the mailbox.

Certificates.SetDeleted

certificates-setdeleted

This runbook only sets a field in the database to deleted for the mentioned certificate in the email. Then it moves the email to the Certificates.Finished folder in the mailbox.

This is the whole solution.

You can download it from github.

Most of the activities are PowerShell activities, so it should not be a big effort to also migrate the runbooks to Azure Automation or SMA.


SCSM 2012: Asset Management Part 2 – Classes and Relationships

This is the second part of the blog series about my Asset Management solution for SCSM 2012 R2.

Part 1: General overview
Part 3: Authoring – Folders and Views
Part 4: Authoring – Forms
Part 5: Reports
Part 6: Runbook/Automation details

This part of the series covers the classes and relationships created with Visual Studio 2015 Community Edition (incl. VSAE).

Classes
The solution has two base classes

  • AssetManagementBaseClass (DisplayName: Asset)assetclass
    The AssetID is automatically filled and auto-increments.
    Some fields reference lists (EnumType), so that the user can select the entries from predefined values.
  • OrderBaseClass (DisplayName: Order)
    order

Four sub-classes (based on AssetManagementBaseClass):

  • ComputerAsset (DisplayName: Computer Asset)
    computer
  • Peripheral (DisplayName: Peripheral)Peripheral
  • ServerInfrastructureAsset (DisplayName: Server Infrastructure Asset)
  • NetworkInfrastructureAsset (DisplayName: Network Infrastructure Asset)

ServerInfrastructureAsset and NetworkInfrastructureAsset are similar to Peripheral, that is the reason why I did not add a picture. Because of the inheritance the sub-classes get all properties from the AssetManagementBaseClass.

And 8 Groups to be able to give permissions to these objects. They all look like this:
AssetGroup
There are separated Groups for Assets, Computer Assets, Peripherals, NetworkInfrastructureAssets, ServerInfrastructureAssets, Orders, Windows Computers and AD Users.

Each group needs to be discovered. So the solution also has 8 discoveries like this:
Discovery

EnumTypes
Each property which should use a list needs an enumtype defined. I also created three additional entries for the AssetStatus list

EnumTypes.JPG

Categories
Categories need to be defined, to be able to see and edit the lists in the console.

The Category  Category.ManagementPackName is required to define that this a SCSM Management Pack:Category

Here is an example how the other categories look like: SiteCategory
The categories with Value=”System!VisibleToUser” enables the user to view the list in the list view.
The categories with the Value=”Authoring!Microsoft.EnterpriseManagement.ServiceManager.UI.Authoring.EnumerationViewTasks
lets the edit task appear in the list view.

Relationships
Relationships are required to be able to reference the different class objects with each other. All relationships are from the type System.Reference.

  • Asset To Order Relationship:AssetToOrderRel
  • Asset To Custodian Relationship:
    AssetToCustodianRel
    With that an AD User can be linked to the Asset as Custodian.
  • Asset To Computer Asset Relationship:
    AssetToCARel
    The same type of relationship is also created for Asset To Peripheral, Asset To NetworkInfrastructureAsset and Asset To ServerInfrastructureAsset.

Remember these relationships as you need to create them when you want to view fields from different related classes in the same view/form. This means when an ComputerAsset object gets created then you also need to create relationship object for the AssetToComputerAsset relationship. Otherwise you cannot show field values from both classes in the same view/form.

You can also create new classes i.e. for mobile devices or software assets. Use these classes here as an example and create all required objects (EnumTypes, Groups, Discoveries, Relationships, Categories).

Here are some additional links:
https://technet.microsoft.com/en-us/library/hh519583(v=sc.12).aspx