You probably have noticed that I have not updated this blog anymore for a longer time.
The reason is that my main topic changed from System Center to ServiceNow.
Because of this I will close this blog now.
Thank you all for following and sharing!
Category: Operations Manager
ServiceNow – SCOM Connector – Setup
Part 1: ServiceNow – SCOM Connector Overview
Part 2: SCOM Connector Setup
This is the second part of my series about the ServiceNow SCOM Connector.
The ServiceNow SCOM Connector supports different versions of SCOM. Since the ServiceNow Jakarta version also SCOM 2016 is supported. SCOM 1801 is not supported yet.
Steps to perform:
- Activate Plug-In
- Create SCOM Service Account User
- Install/Configure MID Server
- Create ServiceNow Credential
- Configure SCOM Connector
Step1: Activate Plug-In
ServiceNow has an Event Management Application, which is part of IT Operations Management (incl. Discovery, Service Mapping and Orchestration) and needs to be licensed separately. Because of this the plug-in needs to be activated by Hi-Support.
Step2: Create SCOM Service Account User
Before you can start to configure the SCOM connector in ServiceNow, you need to create a service account in Active Directory, which has Operator permissions in SCOM, if you want to use the bi-directional connection. With that ServiceNow is able to close alerts, if the incident/alert is closed in ServiceNow and also write the incident number into the Ticket ID field. Alerts will be transferred depending on the assigned SCOM scope – that is the only option to filter. The Active Directory service account also needs Admin permissions on the used MID Server. To be able to use the service account with the SCOM connector in ServiceNow, you need to add the user as a credential in ServiceNow.
Step3: Install/Configure MID Server
To connect your on-prem SCOM instance you need to install a ServiceNow MID Server. This server is really a service running on a Linux or Windows machine in your network. You can even install multiple MID Server instances on one machine. Here are some requirements for the MID Server, which are important. Attention: the MID Server computer needs to be able to connect to your ServiceNow instance through port 443 before you run the setup!
Download the MID Server install files from your ServiceNow instance MID Server > Downloads.
Extract the file to a folder on you Windows MID Server (like C:\ServiceNow\Dev1).
Run the C:\ServiceNow\Dev1\agent\installer.bat and follow the instructions.
After installation, you need to validate the MID Server in your ServiceNow instance MID Server > Servers.
If you already have a running MID Server, then you can use that. You cannot use an existing MID Server, if it already connects to SCCM through the SCCM Connector or another connector, which needs to run the MID Server service with its own service account.
The MID Server, which connects to your SCOM instance needs some additional files, which provide SCOM commands.
Upload those to your ServiceNow instance through MID Servers > Jar Files.
See step 1-4 in this config document.
Step4: Create ServiceNow Credential
To add the credential in ServiceNow, login to your ServiceNow instance with admin permissions. Go to Discovery > Credentials. Click New.
Give the account a name and enter the user id (with domain name i.e. domain\username) and the password. If you already have a running MID Server then you even can specify this MID Server here. Click Save.
Only deploy the credential to those MID Servers, who need it (security constraint).
After creating this ServiceNow credential you need to change the MID Server service to run with the SCOM service account.
Step5: Configure SCOM Connector
Go back to your ServiceNow instance (logged in with Admin permissions).
Browse to Event Management > Event Connectors (Pull) > Connector Instances.
Click New.

Give it a Name.
Select the Connector definition: SCOM.
Enter the Host IP: IP address of the Management Server or Management Server NLB to connect to.
Select Bi-directional, if required.
Select the MID Server, which has the SCOM service account configured to run the ServiceNow MID Server service.
Click Save.
Now the Connector Instance Values appear and can be adjusted.

For all SCOM versions higher than 2012 you need to select scom version = 2012.
Additionally you need to check the date format, if it differs to these defaults.
Then click Test Connector.
If the test was successful, then you should see the first events flowing in within 5 min.
The next part of the series will be Event Rules.
ServiceNow – SCOM Connector – Overview
This is the first part of a series about ServiceNow Event Management with the SCOM Connector.
System Center Operations Manager is a great monitoring tool, but when you start to think about ITIL Event Management, then you realize that the second level event correlation is missing and the automatic integration into other ITIL processes like Incident, Request Fulfillment etc.
You probably think, but there is Service Manager, the ITSM tool from Microsoft, which can be integrated also with SCOM. Yes, but it only only has the direct event to ticket link and no additional event correlation. Also you need a workflow engine like Orchestrator, SMA or Azure Automation to create the references, etc. A lot more separated components, which also need to be maintained.
ServiceNow is a cloud hosted service and one of the leaders in the ITSM area. It has an integrated workflow engine and the intention here is that you only need one console (ServiceNow).
Background
The Event Management application is part of the IT Operations Management area, which also covers CMDB Discovery, Service Mapping and Orchestration. With the Event Management application you connect one or more monitoring sources, which could also be emails sent to your ServiceNow instance, and create ServiceNow events out of it.
The SCOM Connector is only one option to connect external sources to the ServiceNow Event Management application. The SCOM connector takes the SCOM alerts and creates ServiceNow events out of them. The identifier is the SCOM Alert ID. With that it also can later identify which alert to close (bi-directional integration).
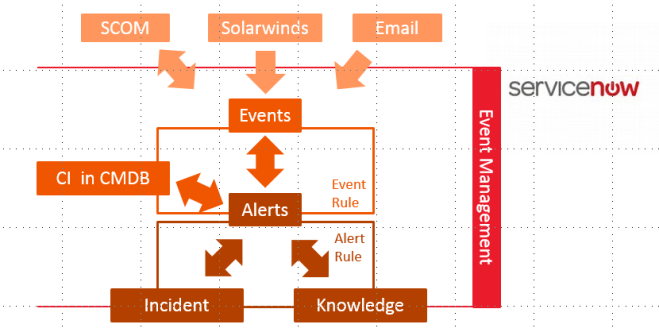
You can see in the picture that ServiceNow takes the events and creates alerts out of them. The beauty of the alert is that it has a relation already to the Configuration Item, which is affected by this alert (Requirement: a filled and maintained CMDB).
ServiceNow has event rules to handle the incoming events:
- Event rules can:
- determine which events can be ignored
- transform data from the events into fields from the alert
- define how to map the correct Configuration Item for each alert
On top of the alerts there are multiple things that can happen:
1. Alert deduplication
Alerts with the same message key, will be correlated to one alert. This is really deduplication.
SCOM alerts have the SCOM Alert ID in the Message Key field of the ServiceNow alert. ServiceNow can automatically deduplicate (multiple events : one alert) on the same Message Key or the same Metric Name. The Message Key does not work or SCOM alerts, but the Metric Name works. If the events do not deduplicate correct to one alert, then check, if the Metric Name is filled. If not, then you can manipulate the Metric Name through an event rule (I would recommend to override it with the MonitoringObjectFullName).
2. Correlation through alert correlation rules
ServiceNow already tries to find alerts, which belong together based on machine learning, but you can create your own correlation rules. The correlation rule always defines, which one is the first alert, and which the second. Then you define what the relationship type is and in which timeframe the alerts should be correlated.
3. Alert flapping detection
Alert flapping detection is a general setting for all alerts, there are no rules, which can be defined. You configure the interval, frequency, quite interval and the minimum time in seconds to wait before an alert gets updated.
4. Alert action rules
With alert actions you can define if i.e. incidents should be created automatically for defined alerts. You can also link knowledge articles automatically or define recovery actions (this requires Orchestration).
I mentioned Configuration Items already, which shows that Event Management has a strong relation to Configuration Management and the CMDB. In order to leverage the full capabilities of Event Management, you will need to have a vital CMDB (minimum have all objects in your CMDB which you monitor in SCOM plus adding them to services => you will see why in the next section)
What do I get, when I connect SCOM to ServiceNow?
- One central alert console for all monitoring sources
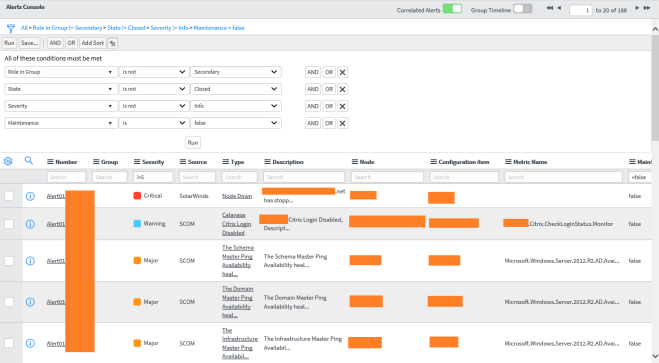
- ITIL automation
– Central Knowledge repository
– Automatic Incident creation and alert closure, when incident is closed (only with bi-directional integration checked) - Service Dashboards
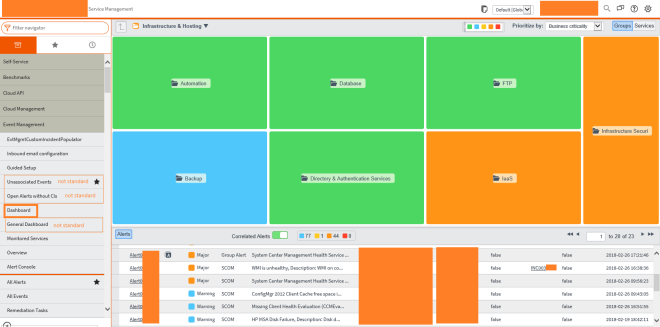
You can define the services you have in your company. Through the relation between the alert and the CI you can see the affected services, where the CI belongs to.
This dashboard only shows alerts, which are affecting the displayed services!
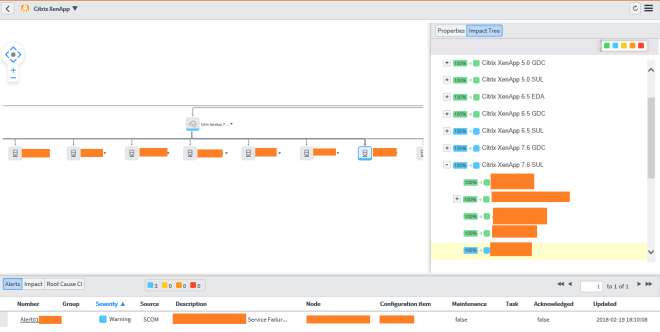
By double clicking one service, you get into the service map view - Central Metric Dashboards, which visualizes the performance data, collected in SCOM (only available with Metric Collection, which needs to be licensed separately)
What is missing?
Alerts which are set into maintenance mode in SCOM are still transferred to ServiceNow, but they do not bring over the field “MonitoringObjectInMaintenanceMode”, therefore you cannot identify them.
I raised this problem with the Event Management product group and hope that they will fix that soon.
Important Notice
Do not try to use ServiceNow to improve your bad monitoring config! Try to avoid alerts in your SCOM environment and give the correct severity there.
ServiceNow
You probably already recognized that I am not blogging a lot about System Center or Azure for a while now. The reason is, that I am mainly working in a ServiceNow integration project at the moment.
ServiceNow is a cloud based IT Service Management platform which is based on ITIL standards.
One of my two roles in this project is to to implement Event Management, which will integrate SCOM and Solarwinds (=> here we have the connection to System Center ;-)). The other role is main administration.
I plan to write a blog post about the event management integration, but also some posts about ServiceNow (probably in a separated blog).
Stay tuned.
CIM 2017
I was pleased to present at the community conference CIM (Community In Motion) in Lingen, Germany, again on Saturday, September 9th.
This year I was also honored to be a CIMStar, which is what other conferences call “Ask the experts”, only that there are no fixed time slots to ask them but you get a green shirt and they can ask you any time. Thanks for that!

My presentation was called “Azure ja, aber wo fange ich damit an?!” (German!), translated with “Azure yes, but where do I start?!”. Which gives guidance on how to select the right services to start with Azure.


All sessions were live streamed, recorded and will also be published.
The conference does not only have technical tracks in the agenda, but a very good and interesting mixture of topics. With all this content, a very good organization and the option to meet great people, the conference is something you should not miss in Germany.
CIM Lingen will be at September 1st 2018 again. See you there!
SCOM 2016 – Agent Maintenance Mode
I was pleased to present a session about “Why we want you to migrate to SCOM 2016” with Bob Cornelissen at MMSMOA in Minneapolis. During this session I presented about SCOM 2016 Agent maintenance mode.
With System Center Operations Manager 2016 we finally have our scheduled maintenance mode and also the option to directly set the maintenance mode from the agent. We do not need custom management packs/solutions anymore to get this functionality. Everything is build in :-).
When I tried the Agent maintenance mode first, I followed this blog post. I want to share some details here:
- Open PowerShell as Administrator, otherwise the module does not work. I tried to set permissions on the registry key, which is used, but that did not help. The module itself seems to check the permissions.

- You need to load the module with the full path, otherwise it is not working:
import-module “C:\Program Files\Microsoft Monitoring Agent\Agent\MaintenanceMode.dll” - The Syntax to start maintenance mode is this:
Start-SCOMAgentMaintenanceMode -Duration 10 -Reason ApplicationInstallation -Comment “Test”

I recommend to use the PowerShell ISE as you then also get the entries for the reason. - The cmdlet writes the information into the registry.
hklm:\Software\Microsoft\Microsoft Operations Manager\3.0\MaintenanceMode\Record

- When you try again to set the maintenance mode and the system is not in maintenance mode yet, then you get this feedback:

Last Maintenance Mode Request pending. Try afterwards. - There is a rule running on the agent, which checks the registry key every 5 min.

The rule runs a PowerShell script (ReadMaintenanceModeRegEntry,ps1), which writes a OperationsManager Event Log entry with the EventID 2222. After that appears, the maintenance mode should been set successfully.

After the maintenance mode is set, you get this message when you try to set it again during the maintenance mode:

- If you want to unset the maintenance mode and set a new one, then you can delete the registry key, unset the maintenance mode in the console and then set the maintenance mode again.
- You can also easily read the key through PowerShell and give users who normally do not have registry access the possibility to check the current maintenance mode window.
function Get-SCOMAgentMaintenanceMode {
$mm=(Get-ItemProperty “hklm:\software\microsoft\microsoft operations manager\3.0\maintenancemode”).Record
$split=$mm.split(“|”)
write-host “Duration:”$split[0]”
Reason:”$split[1]”
User:”$split[2].split(“:”)[0]”
Comment:”$split[2].split(“:”)[1]”
StartTime:”$split[3]
}
Get-SCOMAgentMaintenanceMode
Have fun with it!
SCOM:Veeam VMware Collector: VMware connection data processing errors
This is a short blog post to give you some alert troubleshooting details.
The alert VMware connection data processing errors from the Veeam VMware management pack (8.x) needs a collector server and a Run As Account with permissions in VCenter. Permissions are described in this article.
Alert details:
“The Veeam VMware Collector service was not able to process data it received from the VMware target. Some data could be missing in the VMware API response or it could be a parsing error. Some performance data may not be published. The exact error received from Collector: VP050 Error encountered while retrieving performance metrics for a cluster on system name. The VMware API error returned was: ‘One or more errors occurred.’.”
The alert details talk about performance metrics, which confused me.
The Veeam logs (you get them through the Veeam Enterprise Console) show these details:
[VP120] retrieveDatastores failed, A: No ‘datastore’ objects returned for VC,
Collector cannot access a datastore at the vCenter.
Then, [VP038] buildInventory failed [system name]
Cannot build topology always for system name
And after that you seeing [VP050] performanceDaemon One or more errors occurred.
Possible root causes:
1. system does not have a datastore at all
2. no permissions => re check permissions (see link above)
The permissions need to be set on the top level of the cluster not below!
To check, if the system has a datastore, you can browse the following webpage: http://system name/mob or https://system name/mob. Login with the Run As Account.
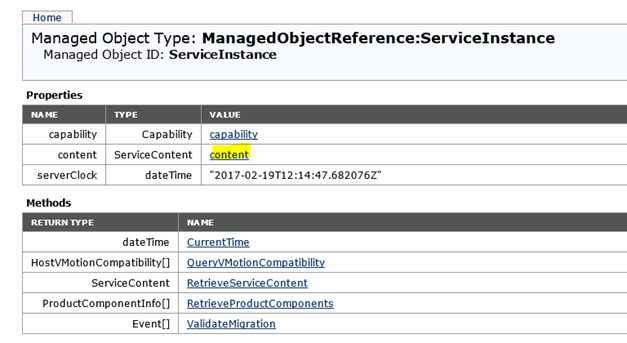
Then click the content link.
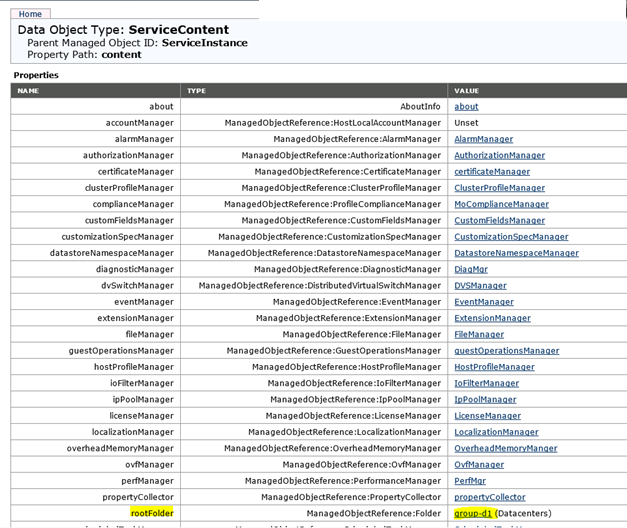
Click the link beside the rootFolder entry.
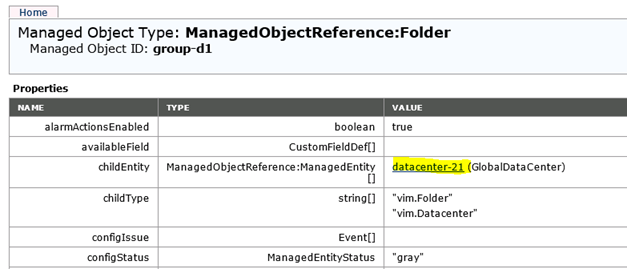
Click the link beside the childEntitiy entry.
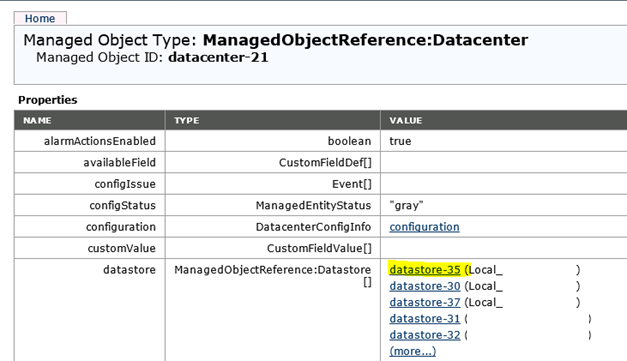
If you see one or more datastores in the list, then the permissions are correct.
You can also click on one of the datastore links to verify.
When both topics are resolved (permissions and datastore access) then the alert should resolve itself.
SCOM: Sample Maintenance Mode MP works on SCOM 2016
With all the great changes related to Maintenance Mode in SCOM 2016 you probably only miss the possibility to easily set Maintenance Mode on the agent without the need of knowing the PowerShell script details.
My old Sample Maintenance Mode management pack can help you with this also on SCOM 2016. I have imported it into my SCOM 2016 test environment and set a server into maintenance mode through it without any problem.
It was required in the past, that you deploy the files separately to the agents to have the Splash Screen available. Now I have added the files to the Visual Studio solution and deploy them to c:\it\mom\mm. The solution also adds a shortcut to the default user desktop and to the public startup folder on Windows Server 2012 and above (also applies to the corresponding client versions). I have used the examples from David Allen’s blog post.
I have posted the sample sealed mpb file on github including also the whole solution.
To adjust the solution to your needs I recommend to change the text in the file OpsMgrMM.ps1 which runs the Splash Screen.
Also you can change the target directory in the DeployableFile.ps1:
$TargetDirectory = “C:\IT\MOM\MM”
You will find both files in the Resources folder.
When you have done your adjustments, then build the solution (seal the mps) and import the mpb file into your SCOM environment. If you had a previous version installed, then you will need to remove that first.
Have fun with it!
OMS Management Packs
If you ever have to author a SCOM management pack, which references Microsoft OMS resources, then it would be good, if you have the management packs to reference.
I was recently searching for the Microsoft.IntelligencePacks.Performance.mp and Microsoft.IntelligencePacks.Types.mp, but could only find the xml here. Sealing this management pack did not help as I needed the original MP (with the signature from Microsoft) for my management pack.
But SystemCenterCore.com provided the information that the MP is part of the Microsoft.IntelligencePack.Core.mpb. And the last hint came from a MVP colleague (thanks Stefan!).
You can find all OMS (formerly Advisor) management pack bundles on the SCOM Management Server which is already connected to OMS. They all get downloaded to C:\Windows\Temp.

Don’t get confused by the names, you can use them as they are. So, for my reference, I selected the Microsoft.IntelligencePack.Core_635779185101086268.mpb in Visual Studio and all included Management Packs appeared – also the Microsoft.IntelligencePacks.Types.mp :-).
AzureRM: Move Virtual Machines to a new subscription
I have a subscription which ends soon, which forces me to migrate my resources to a new subscription. I have used the DevTestLab service to create my System Center test environment, which is a nice feature, but also has some limitations as some resources are locked. I tried to use the Azure PowerShell commands to migrate the resources or tried it directly in the console, but there were always parts which could not be migrated so the Validation failed. The other option I found is directly copy the blob storage. Here are two blog posts about it:
http://gauravmantri.com/2012/07/04/how-to-move-windows-azure-virtual-machines-from-one-subscription-to-another/
https://blogs.msdn.microsoft.com/laurelle/2015/10/01/how-to-move-azure-vm-between-subscriptions/
Both reference the old portal. That cannot be used for virtual machines which are part of a DevTestLab as they are AzureRM resources, which can only be managed in the new Azure Portal.
Both solutions need a tool to browse and copy the blob storage. I have also used the free CloudBerry Explorer for Azure Blob Storage. It reminded me a bit of the old File Commander ;-).
So to move my virtual machines, I had to find out, which storage account was used in my old DevTestLab. Open up your DevTestLab and click on the resource group name in the overview.

You will see all resources which belong to this resource group:

I have two storage accounts, by selecting one-by-one, I find out which one holds the virtual machines.

Click on Blobs and then on Vhds.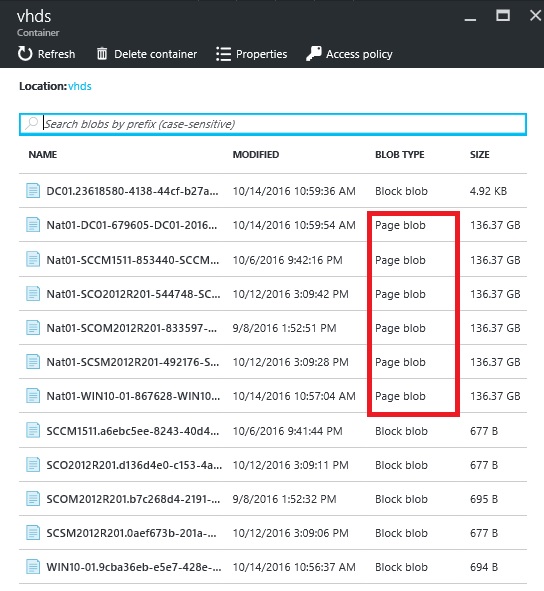
The entries with the Page blob type are the vhds, the Block blob type are the VM Status files.
Now I know the Storage account. Then I created a new DevTestLab in my new subscription and checked which resources are there. There were two storage accounts, both with blob storage assigned, but without entries. Okay. I do not have the details which one you should select, but I selected the first one in the list. Now I have the names of both storage accounts.
To reference these accounts for the copy job, I need one more thing: the Access key. To find that open up the Storage accounts service in your Azure Portal.

Select your storage account, click on Access keys and copy the first key.
You will need to do that for both storage accounts when you create your connection in CloudBerry Explorer.
So open up CloudBerry Explorer and create the connection to both of your storage accounts (old subscription, new subscription).

Enter a Display name, the name of the Storage account and the shared key (which you copied before).
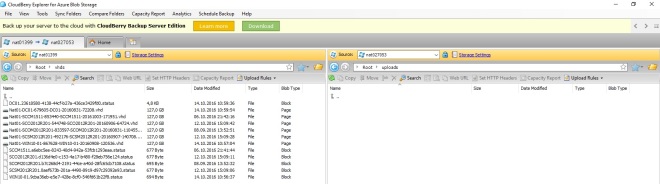
When you have entered both Storage accounts, then you can browse them. On the old storage account browse to Root\Vhds and on the new one to Root\Uploads.
Then select the vhd files one by one and click copy. A queued copy job will start.

The job will close as soon as it is finished.
Now you can go back to the Azure Portal and to your new DevTestLab. The next step is to create Custom Images and the last step is to create the VMs with it.
- Create Custom Images
In you DevTestLab Service, select your lab. Then select Configuration, Custom Images:

Click Add.

Enter a Name for the Image, select the correct VHD and select the OS configuration.
Click OK and the custom image gets created. Wait until this is finished successful. - Create new VMs
Now go back to My Virtual Machines in your new DevTestLab.
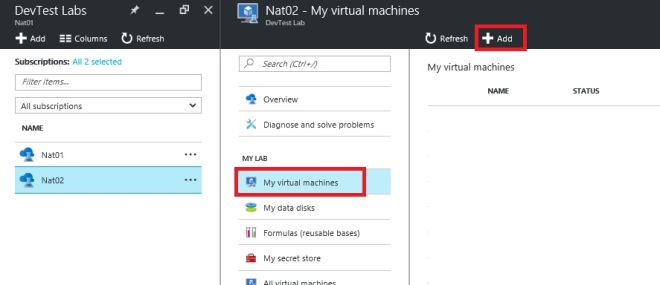
Click Add. And you will see your Custom Images at the top of the base selection.
You can go on with your VM creation as you are used to within your first DevTestLab. If you create a Domain Controller, as I still have it (yes, I should move to Azure AD, will do that later ;-)), then remember to give it a static IP and enter that Ip in the DNS Server configuration of your Azure Network – not in the VM!
When you have verified that the VMs are running in your new DevTestLab, then you can delete your old one and you are done.
Surely you can also use this process to move any other VM which is not part of a DevTestLab.
That is it! Have fun with it :-).
