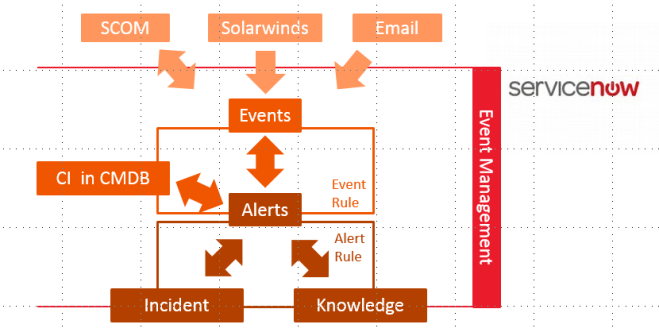
Part 1: ServiceNow – SCOM Connector Overview
Part 2: SCOM Connector Setup
This is the second part of my series about the ServiceNow SCOM Connector.
The ServiceNow SCOM Connector supports different versions of SCOM. Since the ServiceNow Jakarta version also SCOM 2016 is supported. SCOM 1801 is not supported yet.
Steps to perform:
- Activate Plug-In
- Create SCOM Service Account User
- Install/Configure MID Server
- Create ServiceNow Credential
- Configure SCOM Connector
Step1: Activate Plug-In
ServiceNow has an Event Management Application, which is part of IT Operations Management (incl. Discovery, Service Mapping and Orchestration) and needs to be licensed separately. Because of this the plug-in needs to be activated by Hi-Support.
Step2: Create SCOM Service Account User
Before you can start to configure the SCOM connector in ServiceNow, you need to create a service account in Active Directory, which has Operator permissions in SCOM, if you want to use the bi-directional connection. With that ServiceNow is able to close alerts, if the incident/alert is closed in ServiceNow and also write the incident number into the Ticket ID field. Alerts will be transferred depending on the assigned SCOM scope – that is the only option to filter. The Active Directory service account also needs Admin permissions on the used MID Server. To be able to use the service account with the SCOM connector in ServiceNow, you need to add the user as a credential in ServiceNow.
Step3: Install/Configure MID Server
To connect your on-prem SCOM instance you need to install a ServiceNow MID Server. This server is really a service running on a Linux or Windows machine in your network. You can even install multiple MID Server instances on one machine. Here are some requirements for the MID Server, which are important. Attention: the MID Server computer needs to be able to connect to your ServiceNow instance through port 443 before you run the setup!
Download the MID Server install files from your ServiceNow instance MID Server > Downloads.
Extract the file to a folder on you Windows MID Server (like C:\ServiceNow\Dev1).
Run the C:\ServiceNow\Dev1\agent\installer.bat and follow the instructions.
After installation, you need to validate the MID Server in your ServiceNow instance MID Server > Servers.
If you already have a running MID Server, then you can use that. You cannot use an existing MID Server, if it already connects to SCCM through the SCCM Connector or another connector, which needs to run the MID Server service with its own service account.
The MID Server, which connects to your SCOM instance needs some additional files, which provide SCOM commands.
Upload those to your ServiceNow instance through MID Servers > Jar Files.
See step 1-4 in this config document.
Step4: Create ServiceNow Credential
To add the credential in ServiceNow, login to your ServiceNow instance with admin permissions. Go to Discovery > Credentials. Click New.
Give the account a name and enter the user id (with domain name i.e. domain\username) and the password. If you already have a running MID Server then you even can specify this MID Server here. Click Save.
Only deploy the credential to those MID Servers, who need it (security constraint).
After creating this ServiceNow credential you need to change the MID Server service to run with the SCOM service account.
Step5: Configure SCOM Connector
Go back to your ServiceNow instance (logged in with Admin permissions).
Browse to Event Management > Event Connectors (Pull) > Connector Instances.
Click New.

Give it a Name.
Select the Connector definition: SCOM.
Enter the Host IP: IP address of the Management Server or Management Server NLB to connect to.
Select Bi-directional, if required.
Select the MID Server, which has the SCOM service account configured to run the ServiceNow MID Server service.
Click Save.
Now the Connector Instance Values appear and can be adjusted.

For all SCOM versions higher than 2012 you need to select scom version = 2012.
Additionally you need to check the date format, if it differs to these defaults.
Then click Test Connector.
If the test was successful, then you should see the first events flowing in within 5 min.
The next part of the series will be Event Rules.